Crafts and DIY · Sewing

Where is Your Bonnet?

As a mother of a daughter, who has long curly hair, the aforementioned question is part of my nightly bedtime routine. It goes something like, “put your pajamas on, brush your teeth, put on your bonnet, and get in the bed.” After my daughter gets three of the four steps right, I usually find her in bed with her hair sprawled across the Hello Kitty on her pillow. Inevitably we have the same Q&A. “Where is your bonnet?” “Did you look in the bathroom?” Sometimes I just let her use mine.

When you have curly hair or fine hair a satin sleep bonnet is part of the protective line of defense against breakage and dryness. Satin lined bonnets can be expensive, as most things marketed toward curly hair are. This is extremely frustrating if you have to replace them due to wear or loss.

Recently I found a tutorial that showed how to make a diy satin lined bonnet with 1/2 a yard of your favorite fabric and 1/2 yard of satin. In my stash I had 3/4 of a yard of this remnant fabric from Hancock’s Going Out of Business Sale.

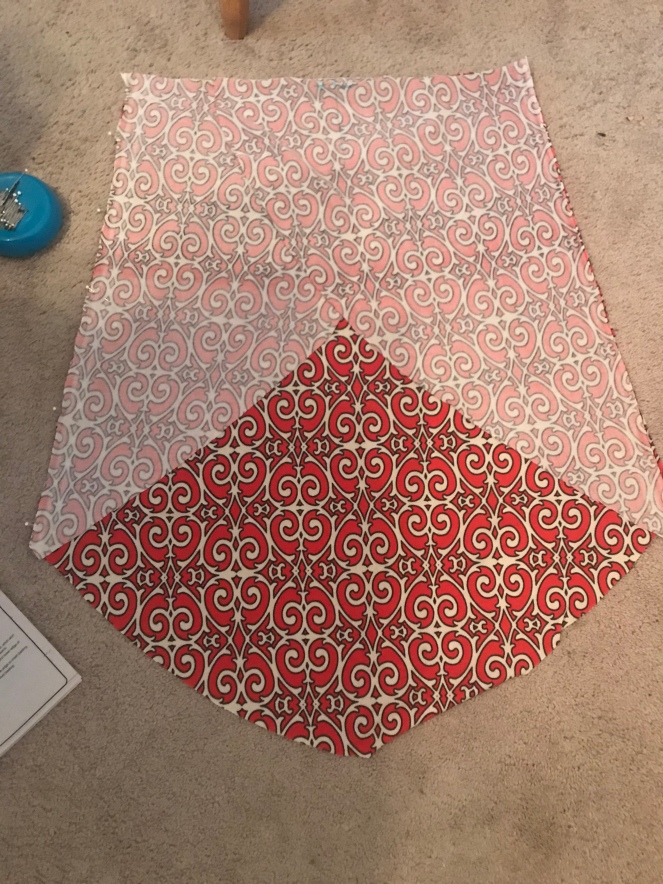
My rationale was if I make a bonnet she loves maybe she’ll keep up with it. I followed the tutorial by Kandra, Easy DIY Reversible Hair Bonnet Tutorial (African Print). The instructions were really easy. I used a 22 X 22 rectangle fold because I was sewing for a child. I cut an 11 inch semi circle cut on the quarter fold.

I then used that cotton fabric to cut the blue satin static free liner. I pinned it right on top, making sure to line up corners, selvedges, and folds.

When opened you have two circles. Sew them right sides together and your in the home stretch.

I used a serger marking my stopping point, an opening marked by two red pins crossed in an X. I turned the circles right sides out and created the 1/2 inch wide sleeve with my sewing machine. I used my bodkin +safety pin technique to thread the elastic.

I closed the seam and stretched the elastic to shape the bonnet. Voila! Here is the finished product.

It took me less time to make it than it would if I would have ran to the local Walmart and been “peer pressured” into self checkout. She loves it! My hope is that she’ll wear it and keep up with it. Keep me in prayer. Only time will tell.

Sewing

Steal that Look: Simplicity 2369 Pants

Spring is finally here but based on the 55 degrees outside I have not yet pulled out the Spring Wardrobe. I did want to make something spring like despite the wet and cold weather. When I came across this polyknit fabric at my local Walmart, I knew immediately they would make a beautiful pair of palazzo pants. It also seems like flowers on pants is back in fashion this spring.

I had this pattern in my stash but had never sown the pants. After reading the reviews I decided to make the finished size based on my hip measurements. The pattern was easy to cut; it was two pieces, one front and one back.

The steps to sew the pattern were exactly the same as the steps for the pattern for the Simplicity pajama pants. The back piece is slightly wider than the front, which gives you good seat room. With right sides together I assembled each leg at the inner seam.

The next part of the directions was written very poorly. I rewrote it on my pattern to say, “Open each leg and put one on top of the other, right sides together.) I then serged the u shape.

They were finally coming together! This is the halfway mark! I flipped the pants so that they looked like a pair turned inside out. I then serged the two side seams.

I followed the instructions to finish the waistband using a tool called a bodkin to thread my 1 1/2 inch elastic. I chose a wide elastic that wouldn’t roll. I also topstitched the casing with a red thread to add a decorative detail.

When all was said and done the pants looked so good! They weren’t as wide as palazzo pants, but they were wide enough. I saw a similar pair of pants at Macy’s.

They retail at 125.00!

Here is my version.

Mine cost me a whopping 8.00.

What do you think? Have you stole a look lately and saved yourself major money? Comment below. Thanks for reading.

Sewing

Simplicity 1064 Pattern Review

Hello friends:

I don’t what the weather has been like for you this winter. It has been quite chilly here in North Carolina this month. I wanted and needed something warm to wear to work, so I rummaged through my stash and chose a sweater knit with a bold pattern for this project. Based on several reviews, I decided to pair my knit fabric with this pattern by Simplicity.

Simplicity 1064 Pattern Description:
Misses’ easy to sew tunics with length variations and tie belt. This versatile mock wrap tunic pairs well with leggings for an easy on trend look. Make it with a long sleeve, short sleeve or sleeveless with a front flounce.

Fabric Used:
Exact description: Bright Red/Cream/Black Scroll Print Poly/Lycra Hacchi Sweater Knit

Pattern Sizing:
Size: 6-8-10-12-14, 14-16-18-20-22

Based on the finished garment measurements I chose to cut a 14.

I generally trace my patterns on freezer paper. I use a warm iron (no steam) to temporarily adhere the pattern to the fabric.

I knew I would love this tunic just by laying out the skirt pieces!
D8451518-7123-4726-A0B4-DCC3AB5AD70A
The instructions were easy enough for an advanced beginner; however, the instructions for the facing weren’t very clear. There are also two darts involved.

When it was done, I think the garment looked better than the picture. I say this because my version wasn’t sheer like a beach cover up.

I didn’t like that the finished pattern was a size bigger than projected. I also didn’t care for how the elastic insert called for a safety pin. I have done this method for pajamas but the casing was wider at 1-1 1/2 inches. I managed to lose the safety pin on try #1 when it detatched from the elastic. Then on try #2 the safety pin popped open inside the narrow casing. I had to get a seam ripper to retrieve the pin. On try #3, I found a great tool called a ball point botkin, and used it to thread the elastic through the casing. This botkin made threading super fast.

Do you know after all of that threading, I found I didn’t like the elastic waist? Sigh 😔. The waist felt bulky despite having been trimmed. I took the casing apart and decided to make a sash belt. The picture below is before I made the sash belt. For my version of B, I also altered the sleeves to have flounces using the method featured here by Pamela Erny.

I plan on sewing this pattern again in a poly satin, but I’ll have to buy the pattern again in the smaller size group. This garment has a lot of ease built in. I used a knit based on reviews of so many others. Although I used a knit and the finished garment measurements to decide what size to cut, the final garment was too big. I will have to go down another size for a better fit.

My final thoughts: The finished garment is beautiful and comfy but a whole size too big. Thank goodness for sash belts and darts.

Crafts and DIY · Furniture and Decor

The Frequency of Color: Yellow Painted Desk

Nothing speaks my personal frequency more than color! If color was one of the five love languages my scale would tip completely to one side. My absolute favorite color is fuchsia, but I try to wear as many colors as possible-without looking like a hippie or gypsy.

The power of color to communicate amazes me. Yes, every color speaks. Today, I am highlighting in yellow-pun intended. My neighbors were clearing out their house and set this real wood desk out. They labeled it free. Score one for me! I brought her home and assigned her to my daughter.

Needless to say, for my seven year old, it was not love at first sight. But to a person with vision…

The only thing wrong with the desk was that it was a little shaky. That was easily remedied with a screwdriver and elbow grease. After cleaning her, I let her sit until I could envision what she could be. My daughter decided that she wanted a yellow desk. This was a challenge for me mentally. I mean in my mind a yellow desk would not compliment the Hello Kitty dresser-sigh. Let me tell you friends; choosing the right yellow is harder than picking white. My first sample turned out like egg yolk. Ew!! That's the wrong frequency. Consequently, I went to Sherwin Williams and got a paint sample in "daisy." Ironically painting those cubbies was no stroll in the park!

I coated it with a satin water-based poly. It was coming along but still needed some Fowlerfactor personalization, which equates to sparkle and color.

First, I stained the drawers with java. I decided to decoupage the drawers with a scrapbook paper and glitter based Modge Podge.

I used some pulls I got from the local ReStore. Well against that fabulous drawer liner they suddenly looked plain, so the pulls got some color too. I amped them up!

I spray painted these by turning a tomato stand (which never worked for my tomatoes) upside down and used the prongs as holders. I let my daughter pick three colors from the drawer liner. I then spray painted each a different color using Rustoleum paint.

After allowing the paint to cure, I screwed them into the drawers. My daughter painted these cute little flowers, so I added them to the bottom drawer. This added her personal touch to the project.

Once everything was put back together the desk looked completely different and totally adorable. Perhaps she has my eye for color after all.

It's now at home in my daughter's room, where it communicates joy and invites my daughter to draw, read, and ahem do homework. For me, it's on to my next project.


My youngest son said it's a true ugly duckling story. What do you think?

Crafts and DIY · Sewing

Creating a Community among Children

Transition and major life change can be hard on families, especially children. So, often as adults we persevere through life's challenging events accepting them as a part of our lot. Yes, we may question God, swear at the obstacle, murmur and complain, but somehow we overcome and pull through. Human will is amazingly creative and resilient!

Children go through those obstacles too! As adults and parents we often set the example for our children of how to act and endure those life challenges. As gate keepers of our children's innocence we must be careful to set a good example, filter what we expose them to, and still remain transparent and sensitive to what our children are feeling in those hard times of change. However, transitions are oftentimes necessary, and gates to new opportunities.

Recently, a church I was attending changed leadership. When we arrived at the church a few years prior, the church was a vibrant, family-oriented , close knit body of believers, led by an experienced elder, who served as senior pastor. However, the transition caused a great falling away and divide among adults. As adults left, with their children, children were separated from friends that they had spent their whole lives with. The church gates were wide open and there seemed to be a mass exodus.

In efforts to bring comfort to and keep unity among the church members, the leadership focused on community and building relationships. I decided to carry this theme into our kids classroom as well. As a teacher, I'm always looking for hands-on-activities to help my students engage in the learning process. I settled on creating a community classroom quilt after reading a post by Kristen Duke of Capturing Joy.

One Sunday I had each student illustrate on fabric squares what they believed their gift to the world is. I worked on the header of the quilt adding in the elements of community emphasized by the pastor. Here is the header:

I chose two different rainbow patterned quilting cotton fabrics to frame the fabric squares and make the bottom of the quilt sandwich. Here is the bottom layer:

I decided to make it a three by three squares tapestry quilt. Here's how it turned out after piecing together everything:

I presented our Gate Kids Community Quilt to the pastor's wife, a photographer and fiercely creative person, as a gift from the class. It served as a commemoration of the church's transition into The Gate, "a place where people will go to, grow in, and become healed."

I think this activity really helped the kids with understanding their own ability to adapt with change. I also believe this activity helped the kids to feel validated because they were affirmed as gifts in the world, who each have a purpose.

What other themes do you think would make a great classroom or community quilt?

In response to the gate writing prompt.

Crafts and DIY

How I put Build-A-Bear on the Back Burner

Each year for either Valentine's Day Or Christmas, I take my youngest two children to Build-A-Bear (BAB) workshop to pick out a friend. My daughter also likes to collect Beanie Boos. Each time she gets a stuffed friend its a different animal. My son is an Avid Star Wars fan, a true lover of the Dark Side. He always gets the Star Wars Edition related bears. Recently, they hinted around at going to BAB for summer family fun day time. Honestly, it's been averaging 91 degrees here; Mama feels like going nowhere. The heat and humidity just drain me. My solution…sew a bear.

I already had this pattern from some 99 cent pattern sale. Plus I needed to practice sewing darts on something small. This pattern has plenty of darts, despite only having only two pieces.

I cut out the pattern onto some remnant fabric I picked up at Hancock's (please come back!) before they went out of business. My daughter's rabbit required a little over a yard. The dog only required a yard.
After sewing the animals I allowed the kids to stuff them. I had to leave a section of the back open for that. They stuffed them quite full.

I then attached the eyes, sewed up the back–I learned how to ladder stitch to do this.

I then decided to satin stitch a quirky little nose on each. Here is how they turned out: Dotty and Kylo Pup.

The kids loved them just as much as the BAB ones. Score one point for Mom! For now, I managed to keep the trip to Build-A-Bear at bay.

Food

Kool-Aid Sherbet Review

Recently a fellow blogger posted how Kool-Aid Sherbet has become one of her kids favorite treats. My own kids also love sherbet; I think it's part of their genetic code inherited fron their Dad, who loves sherbet! I make a lot of home made cake batter ice cream, but I never thought of making sherbet until recently after suffering sticker shock at my local grocery store. Needless to say this pin on pinterest intrigued me.

When Nellie over at Butter with a Side of Bread posted this last month, she stated how she successfully blended this by hand. I decided to make the recipe in my ice cream maker.

I doubled the recipe using 2 Cups of half and half and 4 Cups of whole milk. I only used 1 1/4 C. of sugar. I wisked the sugar in the milk until it was dissolved. I then added in two packs of Black Cherry Kool-Aid. 

Once the Kool-Aid was blended, I followed the same steps as if I were making ice cream. 


I set the timer on 30 minutes. This usually gives me soft serve ice cream. I then transferred the sherbet into a freezer safe container. To harden the mix I let it freeze another 30 minutes before serving. It was still very soft. 


It was firmly set after two hours. My husband and kids loved the sherbet and are excited to try more flavors. In the future, I will reduce the sugar to one cup because I thought it was really sweet. The flavor was stronger than store bought sherbet. Afterward, I wondered if I could double the base but use only one packet of flavor. By the way, I only got a tablespoon of this one. It was gone by the time I got home from work. 

I have since tweaked the recipe to mimic the creamy flavors found at the store.

For orange sherbet here is my recipe:

  • three cups of whole milk
  • two cups of heavy whipping cream
  • 2/3 C. Of sugar
  • 1 packet of Orange Flavored Kool-Aid

Have you tried Kool-Aid Sherbet? What were your favorite flavors? Leave a comment below.

Food

Summer Break Brunches

I think the only adults who look forward to summer break more than children are the teachers. Yes, teachers begin to “check out” mentally around Cinco de Mayo. Children who are home, like mine, all summer often enjoy sleeping until the afternoon. They don’t wake for breakfast; they tend to eat brunch. At our home, summer brunches feature a lot of waffles, eggs, potatoes, bacon, lunch meat, fruit, oatmeal, and green smoothies. However, today I featured a new recipe pin I found on Food.com: Disney French Toast. 

The basic ingredients were simple and in my pantry. I did have to buy a loaf of Texas toast, which my teenage boy ate half of before I started the brunch. I ended up making a half batch. The other ingredients include milk, eggs, baking powder, flour, salt, cinnamon, vanilla extract, vegetable oil, and sugar. I made two substitutions I used half milk and half heavy cream and brown sugar. 


The batter was thicker than I’m used to working with; it reminded me of waffle mix. I dipped the first two pieces and fried them blending vegetable oil shortening and a tablespoon of coconut oil in a pan. They fried to a beautiful golden brown. I then dipped them into the sugar cinnamon topping. I planned to top with whipped cream and strawberries, but those were also eaten the night before. I should start a food gone missing series called ” While I was Sleeping.” 

Here is how the French Toast turned out:


My daughter, the one true princess of the house, asked for French toast sticks. I barely got this picture because she took the plate and began eating before I could get the camera on. 

These were fabulous brunch stars! My kids ate them without syrup! I got one stick and thought the batter lended itself better to the sticks; my husband and son liked the full version better. We’ve never eaten the actual Disney French Toast but we thought this recipe was a great feature in out Weekday summer brunch. Here is the link to the original recipe. If you have leftover brown sugar topping, add a heaping tablespoon to steel cut oatmeal along with pecans and strawberries, this is my copycatt version of Panera Bread’s oatmeal. 

What is your favorite brunch star? Link a recipe in the comments. Thanks for reading. 

Food

Cupcakes in a Jar

Have you ever been faced with the challenge of giving a good teacher gift? As a high school teacher I generally get a lot of food. Two of my children are of the age where they love personalized gifts for their teachers. Recently, we found two pins on Pinterest that gave us two different methods for creating cupcakes in a jar. 

Walmart had these two cake mixes on clearance. I snatched them up with glee. I made the Tie-Die Cake as instructed in the directions using two 9 inch pans. The Thin Mints batter we made and baked in 12 oz canning jars.

–Side note, Do you love my potholders? I made them from leftover fabric and quilting batting. 

Okay back on topic. Here is the Tie-Die Batter Before and after. It makes six colors in total. 
When the cake was cooled, I used a round cookie cutter to make the layers. I then allowed the children to layer cake circles and frosting.


We filled each lightly sprayed jars about halfway with the prepared Thin Mint batter. We baked at 350 for about 35 minutes. After all of our labor was done here is our teacher gifts:

I added fun cupcake liners as decorations. After adding the chocolate gnoch I sprinkled white chocolate shavings on top. Both of the cake batters are very good! The thin mint cupcakes baked up lovely and surprisingly taste spot on to the cookies! Another great Pinterest find! These were a really big hit among my family and the teachers who received them.  
What gifts have you enjoyed making for your children’s teachers? Have you tried cupcakes in a jar? 

Crafts and DIY

Pinterest Sensory Bottles

When you live in the South, there are sweet things that go hand in hand with Southern culture that are easy to get used to: sweet tea, red velvet cake, biscuits, and crispy fried chicken. The hardest thing to get used to for a girl from PA is the consecutive days of 90 degree weather—Sticky humid hot 90 degree weather. School is out, and kids are indoors a lot. I turned to Pinterest for a quick craft yesterday. 

We found a DIY for sensory bottles. It linked back to this blog by Little Bins for Little Hands. It was super simple and I convinced my kids to drink a lot of water before we could start. All you need is a water bottle, some glitter glue, food color (optional), and glow sticks. I  bought my glitter glue and glow sticks at AC Moore. I used Core water bottles:


I filled two bottles 2/3 of the way with hot tap water. Each of my kids was then charged to dump their own glitter glue in the water. The glitter glue we used was this:

My daughter’s glitter glue was fluorescent and cream, my son’s was red. I added a few drops of red food coloring to her water to get a pink color. I added blue to get my son’s to a dark purple; he’s really into the Dark Side of Star Wars. We filled the water bottles slightly below the fill line, capped them, and they shook the bottles until the glue dissolved.  They then snapped a few glow sticks and dropped them in the bottles. We didn’t glue the lids because were going to add more glitter but look how neat they look. 

This Dark One really looks good at night. This was another fun pinterest project. We’ve also made slime although I didn’t post that. However, you can check out my pins here. What pinterest projects have you tried with your children?